Showing posts with label DIYS. Show all posts

Monday, August 02, 2010

It's hot, humid and I'm in my underwear.   Must be time to stain something.  This piece took me 21 years to get it right.   This is one of the first piece of furniture the High Priestess and I bought when we first moved to IOWA.  It cam from a craftsman who had a shop called "The Loading Dock".  The man was an ex-grad student with a PhD. in Science Education, or at least that's what he said.  I should have seen that as an omen.  The chest of drawers was always going to be stained, but we could never agree on a color.  The HP wanted it to match our furniture, but at the time all we had was the random collection of odds and ends most couple and recently graduated students would have.   There was nothing to match.  Even now the bedroom furniture shades are just a little off.  The Nightstand tables match the bed, but the other chest of drawers (mine) comes from somewhere else.

The piece was already sanded and ready for whatever, but we just couldn't decided.  Personally I think the HP was convienced I would fuck it up and it took her 20 years before she trusted me enough with a brush.  She may have been right.  I've learned quite a deal from my other projects.  For you staining you need patience, time, hot weather, and underwear....lots and lots of underwear.

My technique is always the same: sand to open the wood, pre-conditioner helps the wood take the stain deep into the wood, three light coats of stain, then three coats of polyurethane.  The can of stain always say to wipe away the excess stain, but I find it work better if you use very little stain on the brush and work it into the wood until the brush it almost dry.  Let the piece sit for 3 to 6 hours to dry (NOT IN THE SUN), before adding another coat.  Keep repeating until you have the shade you want.  I always do at least two coats, because the first coat never quite takes evenly due to the difference in the wood itself.

The same goes for the polyurethane coats as well, but I don't brush until dry.  You should have enough on the brush so it flows evenly over the wood but does not run or drip.  You may need a very light touch on the side because gravity will make the coating try to run.  The coat should be thin enough so you can see the brush stroke trails as the poly goes on, but the track should disappear after 15 - 30 second after the stroke.  Let the coat dry completely, at least eight hours.  (Never let it dry in direct sunlight!)  The wood should have hard candy like coating.  Lightly sand with 220 grit sandpaper to remove uneven brushstrokes.  You should have a fine white dust that can brush wiped away easily, as if you were dusting a piece of furniture.  Now you should apply the second coat.  Following the same steps for the first.  afterward you should feel a smooth surface under your fingertips.  The surface should not snag or pull on a soft cloth if brushed over it.  You can stop here, but I always add a third coat.

Some side tips now:  Always use natural hair brushes.  Clean your brushes well after you are done, but don't expect the brush you used for poly to ever get clean.  You may use it for crappy jobs again, but next time you need to work on a show piece BUY A NEW BRUSH!  After cleaning your brushes or if you have to step away for short awhile (having to run to the store or something) wrap your brushes in plastic bags.  Make sure there is very little air in the bag and it's air tight.  This keeps your brushes nice and fresh.

The original piece didn't have handles.  You could open the drawers by pulling on the end of each drawer.  However that always annoyed the HP and it's her chest of drawers anyway.  Handles are highway robbery at any DIYS place: Lowe's, Menard's, Home Depot, etc...   I found mine at  Restore for fifty cent each.  The HP and I also found a lovely dining room set for a steal, but that another story.

I redid the handle in the same cherry wood stain I used on the dresser.  I think they came out great.  How does one add handles and make sure they are centered?  I find a great website for that.  Drilling Guide for Drawer Pulls

Shameless Plugs

Sunday, May 30, 2010

Amanda's Back!

My AMD Goddess has been resurrected with more memory, a new hard drive and and a copy of Window 7.  It's looks like everything has final taken and that pesky Blue Screen of Death has taken a holiday.  I do realize that Amanda may be on her last legs here.  I don't think her motherboard is design with 2 GB DIMMs or higher.  That limits her to 4 GB of Ram. Only 2.75 GB of that is usable now, due to issues we have already talked about.  Amanda does seems to be happier in the 64 bit world.   The whole project was only $250, about fifty dollar shy of my first estimate, so it's all good.

Parts list:
1.  Microsoft Windows 7 Home Premium Upgrade

2. Western Digital 500 GB Caviar Black SATA 7200 RPM 32 MB Cache Bulk/OEM Desktop Hard Drive WD5001AALS

3. Axiom - Memory - 1 GB - DIMM 240-pin - DDR2 - 400 MHz / PC2-3200 - CL3 - 1.8 V - registered - ECC

Friday, May 28, 2010

DIYS Gardening - Part VI: Finishing what you started.

As I said last time, my first try at growing tomatoes failed miserably. The plant you see here I bought at the farmer market for 1.50 a piece. I may just do that from now on, since they seems to be doing so well as of this entry. I already have a few tomato blossom, so I'm a happy camper. The strawberries are doing nicely, but I think the hotter than normal weather is retarding their growth.

The last bed hold my pepper plants and broccoli. They seems to be taking rooting, because they have not died yet. Since I was having problems with transplanting, I just cut out the bottoms of the individual packs and planted the whole thing. After the plants establish themselves I'll remove the plastic pack liner.

Saturday, May 22, 2010

Amanda has Alzheimer's: A Building the Perfect Beast Postscript.
Amanda (My AMD Duo Core Goddess) has been having a problem. She tend to forget where she puts things. This is understandable since she is over 4 years old. Last time I had the blue screen of death Amanda had a bad memory DIMM. The fix was pulling the 512 MB DIMM. Problem solved. The Stick sat on my desk for over six months, until I had time to get a replacement from NeoComputer. The DIMM has a lifetime warranty so I can get a new one for free. After ordering one and waiting for a week, I return to find the the store clerk forgot to place the order. (Aside: the NeoComputer in Iowa City seems to have gone downhill in terms of quality.) Long story short: I walk out with a new 1 GB DIMM.

I go home and put my sexy bitch up on the bench and proceed to fondle her innards. She get her six month "dust and suck": CPU, Fans, filters, and GPUs get cleared of all the dust they pick up during the winter. I installed the new DIMM. and we are off and running. Things are great for about two hours of WoW time, but Amanda starts to act funny. POW! Blue Screen of Death (BOD). After a reboot and resetting somethings breaks again after 2 hours: BOD! This happens every time I tax her system with too much information: Playing a Game, while surfing sites with lots of Flash. (Damn You Jello PORN!)

I think I've got a bad stick of memory, but after doing some digging I thinking it is something else. Amanda is partially handicapped. She is a 64 bit processor using 32 Bit Windows XP. Windows XP (32 Bit) can only see about 4 GB of memory period. That includes allocation for RAM, I/O, Cards, Graphics Cards, OS Kernel Space, and a crap load of overhead. Amanda has always been a little twitchy when over 2 GB of RAM. Now I think I know the reason.

Window XP (32 Bit) likes to have 3.5 Gigs of RAX max allocated for running programs and data. The other 512 MB of RAM is for WindowsXP and bookkeeping. That's a gross simiplification, but it makes this next part easier to understand. By adding that new stick of RAM Amanda sometimes loses her mind: 3 GB of RAM, 1 GB of Ram on the Dual SLI Video Card, all that space needed for WIndows XP, USB Card, 3 hard drives, Sound card, and butch of I/O devices. So she forgets where things are placed, which leads to the BOD. The solution is getting Amanda to do 64 bits instead of 32.

Amanda is more than capable of doing such a feat. When she first came off the bench I had her doing Windows XP in 64 bits. XP64 was buggy as a candied apple sitting on an anthill, and many of the drivers I needed weren't 64 bit ready yet. So Amanda got the specail needs version of Windows XP (the 32 bits). That was four years ago, so it's time to make the jump.

Since, she is going back on the bench, I should give her a face lift and a tummy tuck as well. So I need to save some cash for the following: Windows 7 Home Premium (64bit), another DIMM stick 1 GB (Bringing her total to 4 GB), and another Hard Drive for the System. True, I could just reformat the old one, but I want to keep the old drive as a backup. This should set me back about $300.

Thursday, May 20, 2010

What have I been doing Part II or DIYS: Gardening Part V

After taking all that time last fall to finish these beds. I finally had to put them down for the winter. All i really needed to do is keep the dirt from blowing away and keep random seeds from falling into the dirt. Not much to talk about during the winter so fast forward to mid-March.

I wanted to plant seedling instead of seed, so I built a grow light. I started two flats of plants in March in the basement. One flat was tomatoes. The other flat was a combination of broccoli, peppers, and sunflowers. By mid-April I felt like a was growing WEED down in my basement with the amount of moment and attention I was giving theses plants. The High Priestess say these will be the most expensive tomatoes she has ever had. At the same time the plants are doing well in the basements it's time to start working the bed. Which mean a trip to Menards.

Still trying to keep within the $50/week was hard this time. The bags of peat and manure were cheap, but I need to find a way of keeping out the pest, mostly rabbits. I bought some rabbit and pest repellent, which is little more than hot pepper sauce. I still worried so I brought some physical barriers as well. I wanted lasers and landmines, but I can just see little Debbie form next door losing a few limbs. That wouldn't do, so it's chicken wire.

Before I put up the chicken wire I transplanted some of my tomato seedlings. That was an EPIC failure. The starting soil I used was great for indoors as long as the plants stayed indoor. However as soon as I moved the plant the soil just fell away and exposed all the delicate roots. Even with the care I put them into the ground they all died within a week. In addition to the root problem, the Sun can be a real bitch. I learned that most plant produce several kinds of leave depending on the lighting condition. The plants that were growing and thriving under my grow light had not produced any "sun" leaves. Consequently, my poor plant burned before they could produce leaves that would tolerate the solar spectrum. A lesson learned. I may have to start my plants sooner or increase the light intensity. One bed down. Bed number Two needs starting but I want to wait a week or two and let my plant toughen up a bit.

One thing about gardening everyone wants to give you something. In my case, it is my lab assistance Ruth. (Yes, I have a minion. World domination will soon follow! In reality, Ruth would never be a minion. She has told me so on several occasions.) Ruth give me a ton of strawberries, the only fruit that's a weed too. Strawberries spread like wild fire, and a suspect they really just sprout pods that take over people's mind and convince gardeners to give their offspring to other people. The only thing human can do is consume them before they take over. We must eat them In pies, smoothies, shortcake, salads, covered in chocolate and random dessert. Come PEOPLE WAKE UP BEFORE WE LOSE THE PLANET TO THESE RED BERRIED MONSTERS.

OK, so they get a bed by themselves. (YES...MASTER..... I OBEY....)

Finally, two beds planted and one to go. The failure with the tomatoes will have to be rectified by a trip to the farmer's market. Since it is a little late to start tomatoes plants indoors I will buy some and plant those. Yeah, It's a cheat, but I really like tomatoes.

Saturday, January 23, 2010

DIYS Gardening Part III

As You may have figured out all this work I did last fall, but I'm writing about it now. After finishing the woods frame I wait until I could get wood planks on sale. I really want 2 by 12 planks, but I could swing the price and stay below $50 a week. These planks are 2 x 10 and they work just as well. The frames give me a nice solid brace for the plank and they raise the planks up just enough to give me an extra 2 inches of soil depth. The ground is uneven so there is some extra room to fill in with dirt. I've got 4 by 4 cedar post in each corner and the planks are attached to thoses. The post are cut at 12 inches so the box formed by the planks stand on stills which gives that extra two inches I was talking about. If you look closely you can see what I mean.

So that is 9 2x10 8 foot planks, and 2 4x4 8 foot cedar posts. Total was around $50. Add in a box of deck screws, and I spent a little over my budget for the week.

The next thing to do is just fill them with topsoil and I'll be ready to tuck theses beds down for the winter.

Wednesday, December 09, 2009

DIYS Gardening Part II

Originally, I had planned to buy a couple of raised garden bed kits. Each one would be about 8 feet by 4 feet. After shopping around I found most raised bed kits were 4ft by 4ft and about 12 inches deep for about $60 each kit. OMG, I was surprised to say the least. I felt the 10ft by 16ft space could hold three 4ft by 8ft beds with nice walkway between each bed. At the current rate I would have to spend way over my budget to put in exactly what I wanted.

I also want to put in a rocky bed of river-washed stones. Something that would give me a nice walkway between the bed, but your could kneel on without too much trouble. If the stones are well eroded and and small enough the rock bed can be quite cushy.

All of this gets me too my first picture. To cover the entire bed with rocks would take about 58 bags of stone. Even at the cheap $2.50 a bag price, I'd spend far too much in one weekend. Let's not even talk about the pre-made plastic bed. If I want 8 by 4 foot beds I would have to build them from lumber. I can do that, but I wanted to at at least finish the rock bed over the weekend. It occurs to me that I don't have to cover the entire area, I just need to cover the space not taken by the raise bed. That's where the frames you see come in.

The frames act as a guide the the rock bed. They also weight the plastic down so the plastic doesn't blow away. The frames will also act as a template for the raised beds, will anchor the final result and provide support for the the bed when I add the dirt.

The frames mark out enough space that the number of bags of stone I needed went from 58 bags down to just 20 bags. The stone was on sell at Menard's for 2.38, so I was under $50 that weekend. The two by fours for the frames were cheap too. I only needed nine of them. That added another $15 to the weekend, but it would let me wait until I found a great price on the wood planks I would need later.

I spent the rest of Saturday afternoon filling in the walk-space. Then spent Sunday, leveling and tamping down the rock-bed. Don't they look nice?

Monday, December 07, 2009

The Bathroom Is Leaking!
Once again water is my nemesis. The toilet in the kid's bathroom was rocking back and forth, and it seemed to be leaking. This was the same problem i had in my rental unit, so I feared the worst. I figured the sub flooring was going and any moment the toilet would fall thought the second floor and into my living. I had two choices. Ignore it and pray that it would go away, which never happens, or just fix the flooring.

After last summer job of fixing the rental unit's bathroom the second option seemed doable. After a lot of trips to Menard's and Lowe's the High Priestess and I picked a floor pattern we could live with.

Tear down was lot easy this time because I didn't have to get rid of a ceramic tile floor. After removing the toilet the good news was the flooring seemed Okay and not rotten at all. The bad news the flooring seeming to be and a half and inch lower than where it should be. This is what made the toilet rock back and forth. The toilet was literally resting on the flange and nothing else. Without any support from the floor the wax ring was warped and mashed down it into the floor flange. Fortunately, replacing the wood floor would solve most of my problems.

After cutting out the pattern and tracing it on the linoleum, I cut out the linoleum. I spent the next hour listening to the Iowa Hawks play a nail biter of a game while sanding the floor and gluing down the linoleum. (Aside: This project was undertaken early September. Over the next couple of weeks I'll be posting all the little things that have kept me busy this semester.)

Saturday, December 05, 2009

DIYS Gardening: Part I

I have been keeping busy this semester by doing more project around the house. Some time ago I announce I wanted to build a supercomputer network out of used Macs. I had all the Macs but it never quite got off the ground. Something about have too many power bar plugged into too few outlets. I swear Fire marshals can be so picky.

So in late summer I started looking around so another project that might be a bit more useful. Some neighbors of mine have some really nice raised beds for a vegetable garden. I thought, "I can do that!" I had a perfect place in the backyard for a plot to go, beside the old swing set in the backyard was starting to become a death trap. Of course, Technowitch did not think so and chained herself to the swing set to prevent me from taking it down. I wish I had thought to grab my camera and take a picture, but if I left to go get it TW would have hid my tools like she did before she chained herself to the swing set. After an afternoon of work I finally had the wooden play set removed and I could start on the sand.

I spent the next morning removing all the weeds and grasses that have rooted in the sand. All that material was dumped into a new compost pile in the far corner of the backyard. After raking and smoothing the area, I was left with a 10ft by 16ft (about 3.3m by 5m) sandbox. I could have used this space for the garden itself, but the wood play set was pressure treated and most likely had arsenic in it. Who know what would have happened to the fruits and veggies that would have grown there.

Of course, nothing says, "Please take a dump in me", like fresh turned sand. I've had experience with several cats in the neighborhood. They see an open plot of loose sand as their personal kitty litter box. Between that and the chance for heavy metal poisoning, I had to cover things up.

I put down two layers of plastic. Not the most environmentally friendly thing to do, but I wanted everything dead beneath my garden and I wanted to keep toxins from coming in contact with the roots of my plants. the first layer is a thick clear plastic (3 mils thick). This was followed by another layer of black plastic. This was another afternoon of work and afterward I thought I could just stop here and cover everything with concrete. That would make a nice foundation for a hot tub. Then vision of nude Coeds frolicking in my hot tub started dancing in my head. I had been out in the sun too long...

I've started this project with the goal of spending no more than $50 each weekend. After buying a bow rake, the plastic sheeting and replacing the wheel on the wheelbarrow I'm at my $50 break point and I needed to stop. Look for Part II in an upcoming post.

Monday, July 13, 2009

For a while now, I've been wearing ear protection while mowing the lawn, or using power tools. (Yeah, I'm an old guy.) Of course, all that silence, causes me to spend far too much time in my own head, which is definitely not good. So I spend my time my ipod earbuds in my ears with the ear protection over them. It's not as weird as it sounds. I have a lovely pair sound protection FM WORKTUNES headphones from Menards. However, I really want to listen to my Ipod. Worktunes also makes a mp3 player compatiable headphone model, but I'm cheap. Also, I get a chance to work in the Evil Genius Lab/Workshop downstairs. So I whipped these up, using a pair of ear protection head gear, some cheap (free) earbuds, a hobby knife, my dremel tool, and lots of hot glue.

I took off the vinyl ear cushions, and traced the earbud pattern into the foam in the headset. I also cut a channel for the earbud wires using my dremel tool. After making the pattern, it's just a simple matter of cutting out the foam. The hole smaller, but deeper than the earbud. That way you get a tight fit around the earbud, but still have space behind the earbud for glue. It doesn't take that long to do both sides of the ear protection.

Here is the final picture, after everything has been glued in. This project has been bouncing around my head for at least 5 years. It's nice to see something come of it. They work great, but you may have to use a slightly higher volume. Since the earbuds are no longer in your ears the sound is less intense, but the ear protection dulls everything outside so it does work out.

Tuesday, June 30, 2009

Space Again : The Bathroom
Last month my father and I put new flooring in the rental units bathroom. Let me give you a tip for all you people thinking about starting a family and having lots of kids. Never use tile flooring in a bathroom, and for that matter the kitchen. When the High priestess and I moved into this house over 20 year ago, she was enchanted with the tile flooring. It was OK with me. After having kids never again. Everything you drop on the tile floor breaks. If your kids splash (why wouldn't they)in the tub, the water goes everywhere. The grout is a pain in the ass to clean and if it cracks anywhere kiss the subflooring goodbye.

I knew when we moved out, and converted the house to rental property we would have to redo the floor. That moment came in May 2009. As the subflooring went the tiles started to shift, and that make the grout crack even more. Which let more wet get to the wood underneath and destroys the wood, which cause the tile to move and shift more...... You get the point.

So we torn up everything and put down new foundation.
That took about 4 hours. After making a pattern, we cut out the linoleum and installed that. We put down vinyl molding and caulked the hell out of every nook and cranny. Basically turning the bathroom floor into one big bowl. I'm happy now, because it seems to be working.

Saturday, January 26, 2008

In 2006, I spent some time on this blog "Building the Perfect Beast" Amanda, my AMD dual core gaming machine. I'm very happy with her. Amanda's days are filled owning noobs in Counterstrike, Video editting, and burning DVDs. Time for a new project! This year I'm going to build a supercomputer. This is something every mad scientist, evil-genius, arch-villian, or astrophysicist wants.

In a way this is really a moot point. Maxine, my 2 GHZ G4 MACINTOSH cranks out a 2 Gigaflops (2 billion floating point operations per second) without braking a sweat. The first Cray supercomputer (Cray-1) only did 136 Megaflops (millions of operations). The current line of Crays, the Cray-XT3, does 42 Teraflops or trillions of operation per seconds. If I can get 10 Gigaflops I'll be happy. I can finally start doing that weapon research I've been putting off.

I'm going to try to do this under $200. Actually, it not that hard, but I think the High Priestess will freak once I get started. Well, all I have to say it's better than spending my money on Jello-Porn.

What the secret behind a $200 supercomputer? Massive parallel processing. By linking several computers together I can get them to work on the same problem and reach an answer much faster. This is not a new idea: Prof. Frank Mueller turned 8 Playstations 3 into a supercomputer, and University of Southern California getting 233 Gigaflops with 74 G4.

Yeah, It's a total Geek thing.

Thursday, December 20, 2007

Secret Santa/White Elephant 2007

I really like doing Secret Santa stuff with my friends, but I like to do it in my own way. I like giving gifts that are useful, cheap and get the extra stuff out of my house.

Last year I gave away coffee mugs. One thing a teacher has more than enough of are coffee mugs. Every conference, meeting, seminar, and gathering there is a coffee mug that goes with it. All my mugs were festively package in those popcorn tins the Boy Scouts sell every year around fall. I have over half a dozen of the those tins and more than enough coffee mugs, so SHAZAM! Instant Xmas gifts.

This year I went a different route. We can only spend under $5. No Problem. University Surplus was giving away these puppies for a buck a piece! The hard drives were another dollar each. All these cuties needed was a little cleaning and installing the hard drive. They all work and it amused me to give each one a theme and load different software on each of them. (I said they needed to be useful, remember.)

What do I find amazing? I paid $2500 for my Mac SE with 2 disk drives, 1 megabyte of memory and some software. The most expensive Mac here is an Mac SE/30 that went for $6500, back in the day. That's with all the bells and whistles. Some of the hard drives I added were bigger than the original stock computer so the value would be higher.

So what are the Themes? (I know you are dying to ask.)

Old School - Mac SE (800K Drive) - Packed with MacWrite, Mac Paint, and Public Domain games.

I See Stars - Mac SE (Superdrive) - Packed with Astronomy software: Sky Travel, Voyager 1.2 and some cool PD astronomy software and PD games.

Imagination - Mac SE/30 - Packed with MS Word, MS Excel, Superpaint and PD games.

Weird Science - Mac SE (Superdrive)- packed with all my old Physics, Astronomy, Physicals Science software from grad school and PD games.

Come-Pile-On-Me - Mac SE (Superdrive) - Packed with my old Fortran77, Turbo pascal, and Think C compilers. Plus PD games.

All the software comes from my old stuff I don't use anymore, because modern Macintosh don't even have floppy drives! So everything is just given away now.

Friday, June 15, 2007

I fixed my Firestorm 3in1 Sander. I burned out an electrical connection in the unit. It amazes me how simple a lot of the tools we use everyday really are. My sander is nothing more than a motor. Five minutes of cleaning and some soldering and it came roaring back to life.

In reality, the first time I repaired the sander it work for about two hours then I smelled smoke. Ten minute after that I saw flames in the housing. The second time I repaired the unit, I had to replace a wiring connection. It seems the current was too much for the circuit board they were using.

Now my sander is fixed, but now it’s a little temperamental. Sometime you have to jiggle the sander a bit so the electrical connections fire.


Which bring me to my next ten-second item. The Dresser is coming along nicely. I finish sanding it. This weekend I’m working on the staining part. I’m not sure I want to spend the time cleaning the handles. I may just go buy new knobs and stain them, just depend on how cheap they are. So far I got about $40 into this project: $10 for sanding supplies, $10 for my Dremel tool attachments, $5 in stripping solvent, and $5 in sanding masks. This dresser maybe sold at a loss, but the next item should turn a profit because I didn’t exhaust my supplies.

Finally, Finished it doesn’t it look nice.

Thursday, May 31, 2007

Salvaging the World

Another one of my favorite past times when I have the summers off is Dumpster Diving. Ever since I was a kid I always went through other people’s trash. I found all kinds of cool stuff: several pocket knives, coins, toys, books, magazine, and porn. Lots and Lots of porn, you would be surprised what people throw away in what they think is an anonymous trash dumpster, but I digress.

All this fun is multiply tenfold in a college town, and when the neighboring countries have their “throw everything and the kitchen sink away for free” day, I’m in heaven. This is made even more fun in the fact I can ride my recumbent around while I look for stuff. When you are driving through a neighborhood at five the ten miles per hour you see a lot more detail in people’s lives. I have a neighbor we I’ve driven by for the past 3 years, and I know she collects salt shakers because of biking down her street.

In a nutshell, I found some really cool stuff. This is a brass lamp I found. All it needed was some elbow grease and some Brasso. I fixed the switch for three dollars in parts. Wham! Good as new. I just need the right shade and it will be perfect for the home office.


The Next item I found was this lovely dresser. I should have taken a before picture, but I was a little slow on the uptake. The dresser was painted white with blue, pink and purple knobs. It must have been in a kid’s room. I’ve been look for something like this. Not for personal use, just something to work on my refinishing skills. It’d hard to find real wood furniture that can stand up to refinish. Painted furniture is always a gamble because you don’t know if the paint is covering up some bloodstained marks on the piece.

Only bad thing about this dresser, I broke my Sandstorm Sander. As far as I can tell I burn out some wiring in the motor. Getting it fix would cost more than replacing it. Which is something I hate on principle. Why make something so cheap it’s not worth fixing? So I’m waiting for my next paycheck before buying a new orbital sander. I’ll post some before and after picture when it’s done.

I found this at a garage sale. I have always said I need more nude statues around the house. Actually, it just called to me and I thought “What the heck!” I spend more for soda than what this would cost in pocket change. Besides I think she is cute. Some of the details need to be touched up a bit, but it should offset the brass lamp nicely.

Wednesday, July 26, 2006

Building the Perfect Beast: Hard Drive Woes

I’m spending some quality time with my favorite girl in the red dress. FEAR. I am blasting stuff; she is chasing me and scaring the crap out of me. It’s about nine at night and I hear the sound of two squirrels on crack fighting. I figure the squirrels are having a territory dispute and I ignore them. The sound goes away. Time for a snack and some WoW. I’m blasting hordies, kicking butt and taking names. The noise starts up again and my computer freezes. I reboot and the squirrels settle down. They start up again in about ten minutes and Amanda starts acting funny again. Now I start looking for the squirrels.

It’s the Game Hard drive in Amanda. The bearings are going. I’ve never had a hard drive fail on me, so this is new. No problem Amanda’s P160 ANTEC case has a hard rack. I pull the hard drive and thank GOD I had the sense to get the Western Digital drives with 3-year warranty. My theory to system design works like a charm. Separate drive for the three main functions: System Software, Games, and Media. If one drive fails the rest are OK.

I go to Neocomputers and I swap out the hard drive and get a new one. I love these guys! In less than 30 minutes, my new drive is up and running. Yeah, I could have paid to have the drive data restored and moved to the new drive, but it’s just game data. Do I really need my saved game of DOOM III I played on Easter Sunday? Nope!

Wednesday, April 05, 2006

Building the Perfect Beast: Addendum

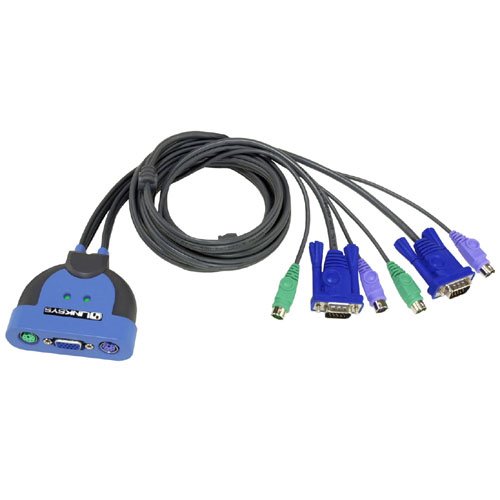
Let me introduce you to my new best friend on my computer desktop. This is the integrated KVM 2-port Switch by Linksys. If I had know this would work so well I might gone with the Athlon FX instead of the dual core. Just a tap on the scroll lock key lets me pop back and forth between Amanda and Antonia. I’m working on my taxes with Antonia, while I play WOW on Amanda.

Tuesday, March 21, 2006

Building the Perfect Beast; Epilogue

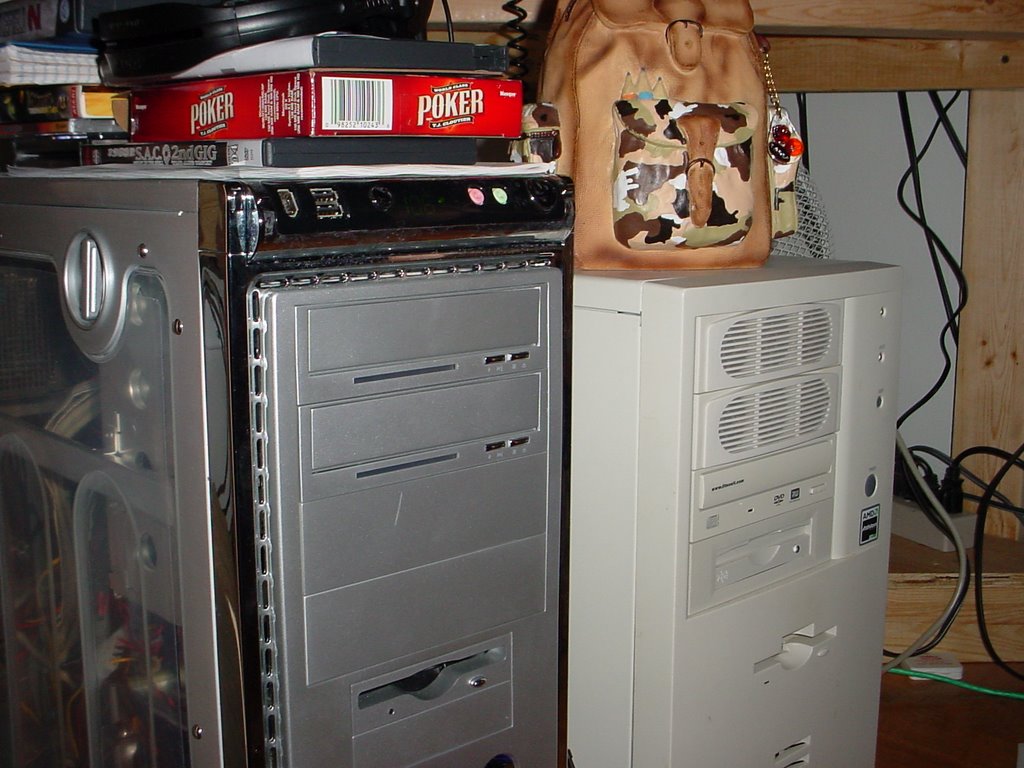
Well the beast is up and running. On a weird note, all my computers have names. A habit I picked up from the physics department. It really made sense after I bought my third computer. My commodore64 was named Celeste. My Amigas were name: Amy and Ana. The Macintoshes were named: Maxine, Celia (she was a Mac Centris 650), Paula (She was a Mac clone by Power Computing.) Then there are the PCs: Diane (DX486), Kathy (K6-AMD), Antonia (Athlon-AMD), etc. I won’t bore you with the rest but I think you get the picture. All the computers in my lab at the college are named after hurricanes and the printer are named after famous scientist: Feynman, Mendel, Copernicus, Fermi, and Newton. It just makes things easier on a network or keeping notes on upgrades. I a little behind in the naming part, with buying/building spurt I had over the last 16 months. I’m thinking Linda for the laptop, Gina and Jenna for the G4s, and the AMD dual Core needs a name. Suggestions anyone?

If you look careful at the picture you can see Antonia sister is running at 106 F. There are two temperature sensors in the case. Each one is attached to a graphics board. Playing World of Warcraft the temperature stay about 115 F. When I play F.E.A.R. The temperature tops out around 145 – 157 F. Work it girl!

I came across a neat book that talk about a lot of the same thing s I covered in this series. You might want to check it out for some fun reading: Build the Ultimate Gaming PC.

Wednesday, March 15, 2006

Building the Perfect Beast – Bell, whistle and other toys.

Now that we have the CPU, motherboard, and graphics card finished. Almost all the other choices are already decided. The above parts are the most expensive ones and the rest of my cash is going for little stuff. Hard drive prices are around $1 to 50 cents a gigabyte it seems silly to worry about cost now. I remember my first external SCSI drive of my Mac SE cost $525. That was a 20 MB hard drive and I thought that was huge! Now the sizes are so large and the drive so cheap you can pick a couple for $80 each just because you can. I’ve learned a few things building computer for my own use in the past few years, and I ‘m willing to share my person insights.

First you might think I brought a gaming hard drive, one of the really fast 10,000-rpm hard drives with 40 GB of memory. Nope. Those drive are nice, but most games I play the bottlenecks do not occur from getting information off the hard drive. I would think if I was playing or editing video off the drive that would be ideal, but I don’t have that problem. If I did use one of these drives I would make it a system core drive. I have found that having one drive complete dedicated to windows is the best way to go. The system core drive would also contain all the things like: drivers, updates, plug-ins, and application I uses everyday. All the caching happens on that drive, too. My theory is that all the system files on one drives speed up the daily task by a little bit. Games are on their own drive. Media files, pictures, mp3s, and video have their own drive too.

So the beast will have three drives: one 80 GB system core, 2 160 GB drives for Games and media files. The other advantages is if one drives goes bad, I can just pull the drive, wipe it or fix it while the other drives are unaffected. I suppose using a fast “game drive” as the system core would speed up things even more but I’m not spending four dollars a gigabyte for a smaller faster drive.

All the drives are Western Digital, because of the 8 - 16 MB of cache each drive has and the three-year warranty. Beside the hard drives, I need to add a few things beside just the now unless floppy drive.

On the optical side of the beast are two drives. The first one is a DVD-/+RW drive with LightscribeTM. LightscribeTM is that cool technology that let you write labels using the drive’s laser. I burn a lot of CDs and DVDs, but my labeling scheme leaves something to be desired. I figure all the stuff I really want to keep, I’ll put on a LightscribeTM disc and make a descent label. That way all my CD for my car aren’t label Booty Mix I, Booty Mix II, Booty Mix III…you get the picture. The thing that is just amazing is how little theses drives now cost, and the light scribe feature was just $10 than the going rate on a normal DVD burner. I’ve also added a CD-/+RW drive too. CD burner drives are so cheap now, why not added a second drive.

Now I know Blu-ray is coming out, but I can wait until the standard really takes off. They just started releasing games on DVD.

I guess this is pretty much it. The Breast should tide me over for the next couple of years, unless Cyberdyne comes out with the neural network chip.

(Note: This post is a little overdue. I have a confession to make. Two weeks ago I final got my teaching bonus cash for this semester. I order the parts, build the system, and now she sit next to my other PC. OMG! This is so cool! I will take pictures and put them in a later post.)